
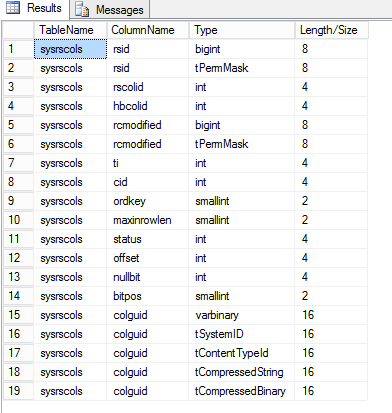
SQL: Column metadata query
A friend of mine asked a question on how to retrieve SQL column metadata, hence wrote this query with help from stack overflow.
I had to make some adaptations; basically used a nested query to create temporary result set in order to apply a filter on a column alias.
In order to use this query please remember to change value for the Where clause on column alias TableName. For e.g. ‘%MyTableName%’ to filter any TableName containing string ‘MyTableName’. For exact results please remove %% from the where clause. For e.g. ‘MyTableName’.
You can add more columns to this output by choosing columns from output of following query: select * from sys.columns. Then add the column to the nested query along with an appropriate column alias.
Select * from
(Select
object_NAME(Columns.object_id) As TableName,
Columns.name As 'ColumnName',
Types.name As 'Type',
Columns.max_length As 'Length/Size'
from sys.columns Columns INNER JOIN sys.types Types  ON Types.system_type_id = Columns.system_type_id)
AllColumnMetaData
Where TableName like '%sysrscols%'
Hope this helps. Good day!
PowerShell: Working with System.Security.Claims.ClaimsIdentity to manage user identity
System.Security.Claims.ClaimsIdentity is the .Net class that helps management of a claims based user identity using which you can add claims to a .Net application for more granular user control based on the user claims provided by the issuer in your application.
MSDN Link to class documentation:
https://docs.microsoft.com/en-us/dotnet/api/system.security.claims.claimsidentity?view=netframework-4.7.2
For example…
1. switch the UI to a different view if role of user logged in is the company CEO.
2. switch site theme based on users favorite color.
3. switch site locale based on user country or show a customized greeting.
4. restrict access to site based on user age.
5. etc…
Here is a short script to assign claims to the current thread principal and verify user claims using PowerShell.
# Add assembly for displaying message box
Add-Type –AssemblyName System.Windows.Forms

# Claims
$claims = New-Object System.Collections.Generic.List[System.Security.Claims.Claim]

# Add claims to claims list
$claims.Add(((New-Object System.Security.Claims.Claim([System.Security.Claims.ClaimTypes]::Email, "nibu.bt@gmail.com"))))
$claims.Add(((New-Object System.Security.Claims.Claim("WebSite", "http://ntcoder.com"))))
$claims.Add(((New-Object System.Security.Claims.Claim("Primary Skill", "C++"))))
$claims.Add(((New-Object System.Security.Claims.Claim([System.Security.Claims.ClaimTypes]::Country, "India"))))
$claims.Add(((New-Object System.Security.Claims.Claim([System.Security.Claims.ClaimTypes]::Role, "CEO"))))


# Instantiate claims identity object
$cid = New-Object System.Security.Claims.ClaimsIdentity($claims, [System.Security.Claims.AuthenticationTypes]::Password)

# Assign principal
[System.Threading.Thread]::CurrentPrincipal =  New-Object System.Security.Claims.ClaimsPrincipal($cid)

Write-Host "Current Thread Principal: " -NoNewline
[System.Threading.Thread]::CurrentPrincipal | Select-Object -ExpandProperty Claims | Select-Object Issuer, Type, value | Format-Table -AutoSize

# Write authentication status
Write-Host "Authenticated: $($cid.IsAuthenticated)"

$tp = [System.Threading.Thread]::CurrentPrincipal

# Check if user is CEO, if yes then display a messagebox, check above role that we added
if($tp.IsInRole("CEO"))
{
    $null = [System.Windows.Forms.MessageBox]::Show("Welcome CEO, opening CEO view...", "User", [System.Windows.Forms.MessageBoxButtons]::OK,[System.Windows.Forms.MessageBoxIcon]::Information)
}

# Check country of user, if India then display an Indian greeting message.
if($tp.HasClaim([System.Security.Claims.ClaimTypes]::Country, "India"))
{
    $null = [System.Windows.Forms.MessageBox]::Show("Namaskar!", "Greetings!", [System.Windows.Forms.MessageBoxButtons]::OK,[System.Windows.Forms.MessageBoxIcon]::Information)
}
Script output follows...

PS C:\> c:\NibuRoot\Powershell\powershellsnips\Claims.ps1
 Current Thread Principal:
 Issuer          Type                                                               Value
 ------          ----                                                               -----
 LOCAL AUTHORITY http://schemas.xmlsoap.org/ws/2005/05/identity/claims/emailaddress email@gmail.com
 LOCAL AUTHORITY WebSite                                                            http://ntcoder.com
 LOCAL AUTHORITY Primary Skill                                                      C++
 LOCAL AUTHORITY http://schemas.xmlsoap.org/ws/2005/05/identity/claims/country      India
 LOCAL AUTHORITY http://schemas.microsoft.com/ws/2008/06/identity/claims/role       CEO

 Authenticated: True
ActiveDirectory: PowerShell script to translate a Windows SecurityIdentifier (SIDs) to UserNames using System.Security.Principal.SecurityIdentifier.Translate
I was on a customer case where SharePoint requests were taking significant time to complete. The issue eventually turned out to be because of a low value for MaxConcurrentAPI which in turn caused incoming SID resolution calls to pile up at the DC. This post is not about MaxConcurrentAPI, if you want to know more about MaxConcurrentAPI please read following article:
https://blogs.msdn.microsoft.com/spatdsg/2006/01/05/maxconcurrentapi-or-how-fast-can-you-authenticate-users/.
But the reason I’m writing this post is because of a script that I wrote to reproduce the SID resolution issue with a DC. At the heart of this script is the following script block….
#Script block which will be used by Powershell Jobs
$ADSidResolve = {
    param($sid)
    Write-Host "SID: $sid"
    $objSID = New-Object System.Security.Principal.SecurityIdentifier($sid)
    $objUser = $objSID.Translate( [System.Security.Principal.NTAccount])
    $objUser.Value
}
I’m using the System.Security.Principal.SecurityIdentifier.Translate API to translate a SID to username. To translate a username to its SID, use System.Security.Principal.NTAccount.Translate API instead. Here’s a sample script which accomplishes that…
#Script to translate currentuser's username to SID
$currentUser = [System.Security.Principal.WindowsIdentity]::GetCurrent()
$currentUserName = $currentUser.User.Translate([System.Security.Principal.NTAccount])
$objSID = New-Object System.Security.Principal.NTAccount($currentUserName)
$objUser = $objSID.Translate( [System.Security.Principal.SecurityIdentifier])

Write-Host "Current user: $currentUserName, SID: $($objUser.Value)"
Here’s the full script to translate a file full of SIDs to username, I used this script to stress test DC. Note that this script executes SID resolution in parallel using PowerShell jobs so this script is a good tutorial for using PowerShell jobs as well.
When running this script please make sure you’ve got C:\Sids.txt created with all the SIDs in it. Also note that there is a better way (using System.Security.Principal.IdentityReferenceCollection.Translate) for translating these SIDs but since I am simulating a customer scenario so I had to follow this route.
#follow this script on github: https://github.com/nibubt/powershellsnips/blob/master/ADSIDResolve.ps1

$filePath = "C:\sids.txt" #make sure this file contains SIDs that needs to be resolved.

# Verify file status #
if((Test-Path $filePath) -eq $false)
{
    Write-Error -Message "File $filePath does not exist. Please correct file path before using this script. Exiting!"
    return
}

#Read in UserName and Password securely
$username = Read-Host -Prompt "Please enter username: "
$pwd = Read-Host -Prompt "Please enter your password: " -AsSecureString
$cred = New-Object System.Management.Automation.PSCredential($username,$pwdz
if($null -eq $cred)
{
    Write-Error -Message "Invalid credentials! Exiting!"
    return;
}

# Count of lines to show progress
$sidlines = Get-Content -Path $filePath | ForEach-Object{$_.Trim()}
$totalLines = ( $sidlines | Measure-Object -Line).Lines

if(0 -ge $totalLines)
{
    Write-Error -Message "File $filePath empty?! This file must contain the SIDs you're intending to resolve! Exiting!"
    return
}


#Script block which will be used by Powershell Jobs
$ADSidResolve = {
    param($sid)
    Write-Host "SID: $sid"
    $objSID = New-Object System.Security.Principal.SecurityIdentifier($sid)
    $objUser = $objSID.Translate( [System.Security.Principal.NTAccount])
    $objUser.Value
}

$alljobs = @()
$curLine = 0
foreach($line in $sidlines)
{
    ++$curLine;
    $JobName = "PSJOB-SIDResolve-$line"
    $alljobs += Start-Job -ScriptBlock $ADSIDResolve -Name $JobName -Credential $cred -ArgumentList $line

    $PercentComplete = [math]::round((($curLine/$totalLines)*100),0)
    Write-Progress -Activity "Progress resolving SID... (Current line: $curLine of $totalLines)" -Status "$PercentComplete% Complete:" -PercentComplete $PercentComplete
}

#Wait for jobs to finish, in the end print the output
Write-Host "Waiting on jobs to finish..."
Get-Job | Wait-Job | Receive-Job

Remove-Variable alljobs,sidlines
Since output of this script is confidential, I’m skipping output but note that this does work :-).
Also note that there is a SysInternals tool that does a similar job. Its called PsGetSid: https://docs.microsoft.com/en-us/sysinternals/downloads/psgetsid
SharePoint: Find an SPFeature by DisplayName
I needed to find a particular SPFeature across a SharePoint farm so wrote up this PowerShell script. Sharing with you all this PowerShell script, also this script has some neat formatting code which you could find useful.
#Follow this script on GitHub: https://github.com/nibubt/powershellsnips/blob/master/FindFeature.ps1

Add-PSSnapin *SharePoint*

function WriteFeature($features, $tabs)
{
    if($features -ne $null)
    {
        ForEach($feature in $Features)
        {
            Write-Host $("`t" * $tabs)"-> Found Feature: Title: $($feature.GetTitle(1033)), DisplayName: $($feature.DisplayName)" -ForegroundColor Cyan
        }
    }
}

$FeatureDisplayName = "SiteLevelPolicy"

Write-Host -ForegroundColor Green "Script output in DisplayName and Title format..."
Write-Host "Looking for feature: $FeatureDisplayName" -ForegroundColor Yellow

$tab = 0
Write-Host $("`t" * $tab)"-> Farm"
$feature = Get-SPFeature -Farm -ErrorAction SilentlyContinue | Where-Object{$_.DisplayName -imatch $FeatureDisplayName}
WriteFeature $feature ($tab + 1)

ForEach($WebApp in Get-SPWebApplication)
{
    $tab = 1
    Write-Host $("`t" * $tab)"-> WebApp: $($WebApp.Url)"
    $feature = Get-SPFeature -WebApplication $WebApp.Url -ErrorAction SilentlyContinue | Where-Object{$_.DisplayName -imatch $FeatureDisplayName}
    WriteFeature $feature ($tab + 1)

    ForEach($Site in $WebApp.Sites)
    {
        $tab = 2
        Write-Host $("`t" * $tab)"-> Site: $($Site.Url)"
        $feature = Get-SPFeature -Site $Site.Url -ErrorAction SilentlyContinue | Where-Object{$_.DisplayName -imatch $FeatureDisplayName}
        WriteFeature $feature ($tab + 1)

        ForEach($Web in $Site.AllWebs)
        {
            $tab = 3
            Write-Host $("`t" * $tab)"-> Web: $($Web.Url)"
            $feature = Get-SPFeature -Web $Web.Url -ErrorAction SilentlyContinue | Where-Object{$_.DisplayName -imatch $FeatureDisplayName}
            WriteFeature $feature ($tab + 1)
        }#End ForEach
    }#End ForEach
}#End ForEach

PowerShell TidBits: Creating Excel Workbook and filling out data into WorkSheets
PowerShell provides multiple ways to access Excel. My favorite so far is via COMObject Excel.Application. This object provides direct access to Excel workbooks, worksheets. In this short article we’ll see how to accomplish this using PowerShell and Excel’s COMObject.
Instantiating Excel COM Object using New-Object PowerShell CmdLet
Using following line of code to instantiate Excel COM object.
|
1
|
$excelObj = New-Object -ComObject Excel.Application |
Creating an Excel workbook
|
1
|
$excelWB = $excelObj.WorkBooks.Add() |
Get reference to a worksheet
|
1
|
$excelWS = $excelWB.WorkSheets.Item(1) |
Get reference to an excel worksheet cell
Change attributes of a Cell using following code…
|
1
2
|
$excelWS.Cells.Item(1, 1) = "Test"$excelWS.Cells.Item(1, 1).Font.Bold = $true |
Sample code to fill out an Excel worksheet
I’m here using Get-Process cmdlet to generate some data in tabular format. But basically, below script uses above logic to fill out the sheet…
|
1
2
3
4
5
6
7
8
9
10
11
12
13
14
15
16
17
18
19
|
$excelObj = New-Object -ComObject Excel.Application$excelWB = $excelObj.workbooks.Add()$excelWS = $excelWB.WorkSheets.Item(1)#Get processes running on my machine$procs = Get-Process#Get all column names, process class' property name$ColumnNames = $procs[0].GetType().GetMembers() | Where-Object{$_.MemberType -eq "Property" -and $_.MemberType -ne "Module"} | %{$_.Name}#Make main excel window visible$excelObj.Visible = $true#Add excel column title$cIndex = 0; #Column index$ColumnNames | %{$cIndex++;$excelWS.Cells.Item(1, $cIndex).Font.Bold=$true;$excelWS.Cells.Item(1, $cIndex)=$_}#Add process information into excel rows$rIndex = 1;$procs | %{$cIndex = 0;$rIndex++;$proc=$_;$ColumnNames | %{$cIndex++;$excelWS.Cells.Item($rIndex, $cIndex) = "$($proc.$($_))"}} |
Output

Another option
PowerShell now does come with built in Excel support if you’re ok to install following module…
|
1
|
Install-Module ImportExcel |
With this module in place you can run commands like…
|
1
|
Get-Process | Where Company | Export-Excel C:\Temp\ps.xlsx -Show -IncludePivotTable -PivotRows Company -PivotData @{Handles=”sum”} -IncludePivotChart -ChartType PieExploded3D |
This will create an excel workbook with data in a pivot table. For this case we’ve set PivotData to sum of handles based on product company.
References
PowerShell TidBits: How to get newest event log entries from all SharePoint servers
Why?
While debugging a crash on a customer SharePoint farm, we had to do constant checks on all SharePoint servers for latest entries in the ‘System’ eventlog. So wrote this PowerShell one-liner, using Get-EventLog, to help him out…
How?
Get-SPServer | Where-Object{$_.Role -ne "Invalid" } | %{ Write-Host "++++++++++++++++++ComputerName: $($_.Name.Split('.')[0])+++++++++++++++++++++++";
Get-EventLog -ComputerName $_.Name -LogName System -Newest 10} | ft -AutoSize
Command explained
- Get-SPServer: return all servers in the farm.
- Checking role of each server to make sure we’re accessing just the SharePoint servers.
- Drawing a header right before dumping out event log entries. If name is FQDN then we just take the first part, not necessary though.
- Call Get-EventLog by passing in computer name and log category as ‘System’, we’re retrieving newest 10 entries. Feel free to change this.
If you run into any issues or if you have any better way of doing this please let me know.
Sample output
PS C:\Windows\system32> Get-SPServer | Where-Object{$_.Role -ne "Invalid" } | %{ Write-Host "++++++++++++++++++ComputerName: $($_.Name.Split('.')[0])+++++++++++++++++++++++";
Get-EventLog -ComputerName $_.Name -LogName System -Newest 10} | ft -AutoSize
++++++++++++++++++ComputerName: SP+++++++++++++++++++++++

Index Time         EntryType   Source                  InstanceID Message
----- ----         ---------   ------                  ---------- -------
19665 Jan 08 12:00 Information Service Control Manager 1073748860 The Software Protection service entered the stopped state.
19664 Jan 08 12:00 Information Service Control Manager 1073748860 The Software Protection service entered the running state.
19663 Jan 08 12:00 Information EventLog                2147489661 The system uptime is 1026236 seconds.
19662 Jan 08 10:21 Information Service Control Manager 1073748860 The Windows Modules Installer service entered the stopped state.
19661 Jan 08 10:19 Information Service Control Manager 1073748860 The Windows Update service entered the stopped state.
19660 Jan 08 10:19 Information Service Control Manager 1073748860 The Windows Modules Installer service entered the running state.
19659 Jan 08 10:14 Information Service Control Manager 1073748860 The Windows Store Service (WSService) service entered the stopped state.
19658 Jan 08 10:09 Information Service Control Manager 1073748860 The Windows Store Service (WSService) service entered the running state.
19657 Jan 08 10:07 Information Service Control Manager 1073748860 The Windows Update service entered the running state.
19656 Jan 08 07:18 Information Service Control Manager 1073748860 The Windows Modules Installer service entered the stopped state.
PowerShell TidBits – How to list all printers installed on a computer?
Use following PowerShell commands to list all printers installed on any machine…
First command uses WMI (Windows Management Instrumentation)…
Get-WmiObject -Class "Win32_Printer" -ComputerName "localhost" | ft -Property Name, DriverName, SystemName, ShareName -AutoSize
Command Output
Name                           DriverName                                  SystemName        ShareName
----                           ----------                                  ----------        ---------
Send To OneNote 2016           Send to Microsoft OneNote 16 Driver         MYMACHINE
Microsoft XPS Document Writer  Microsoft XPS Document Writer v4            MYMACHINE
Microsoft Print to PDF         Microsoft Print To PDF                      MYMACHINE
Fax                            Microsoft Shared Fax Driver                 MYMACHINE
The next command uses built-in PowerShell command Get-Printer…
Get-Printer -ComputerName mymachine
Command Output
Name                           ComputerName    Type         DriverName                PortName        Shared   Published  DeviceType
----                           ------------    ----         ----------                --------        ------   ---------  ----------
Send To OneNote 2016           mymachine       Local        Send to Microsoft OneN... xxx:            False    False      Print
Microsoft XPS Document Writer  mymachine       Local        Microsoft XPS Document... xxxxxxxxxx:     False    False      Print
Microsoft Print to PDF         mymachine       Local        Microsoft Print To PDF    xxxxxxxxxx:     False    False      Print
Fax                            mymachine       Local        Microsoft Shared Fax D... xxxxxx:         False    False      Print
Please note that I’ve removed some printers from this list due to security issues.
Why application crashing with HeapCorruption failure?
What’s a Heap?
Before understanding HeapCorruption here’s a quick review of the Heap. The HeapCreate function creates a private heap object from which the calling process can allocate memory blocks by using the HeapAlloc function. HeapCreate specifies both an initial size and a maximum size for the heap. The initial size determines the number of committed, read/write pages initially allocated for the heap. The maximum size determines the total number of reserved pages. These pages create a contiguous block in the virtual address space of a process into which the heap can grow. Additional pages are automatically committed from this reserved space if requests by HeapAlloc exceed the current size of committed pages, assuming that the physical storage for it is available. Once the pages are committed, they are not decommitted until the process is terminated or until the heap is destroyed by calling the HeapDestroy function.
We don’t directly interact with this function but internally the boiler plate application code does this, for e.g. CRT heap. When we use ‘new’, ‘malloc’, internally somewhere there’s a call happening to HeapAlloc. When we call ‘delete’ or ‘free’ internally somewhere there’s a call happening to HeapFree.
So what’s HeapCorruption?
Any inconsistency that’s caused to a process heap because of application code can be called a HeapCorruption. For e.g. Since most of the time the heap memory blocks are in the form of a linked list, linked to each other, so if we end up overwriting these links then we call that a heap corruption because the heap cannot be traversed anymore from one linked list node to the other.
We could see an application crashing with following error…
0:143> .lastevent
Last event: 616c.a550: Unknown exception – code c0000374 (first/second chance not available)
debugger time: Tue Jun 13 12:41:19.531 2017 (UTC – 5:00)
0:143> !error c0000374
Error code: (NTSTATUS) 0xc0000374 (3221226356) – A heap has been corrupted.
But in my case even though application crashed due to c0000374 and when I check the reason for HeapCorruption, I got the following…
Error type: HEAP_FAILURE_INVALID_ARGUMENT
So essentially the heap is not corrupted but we passed an invalid argument for heap free function hence this failure. So how do I verify that this is indeed the reason? So, we pick up the address that was passed on to HeapFree function and then analyze it using the !address command…
0:143> !address 0x0000003c`5cec97a8
Usage: Stack
Base Address: 0000003c`5ceae000
End Address: 0000003c`5ced0000
Region Size: 00000000`00022000 ( 136.000 kB)
State: 00001000 MEM_COMMIT
Protect: 00000004 PAGE_READWRITE
Type: 00020000 MEM_PRIVATE
Allocation Base: 0000003c`5ce50000
Allocation Protect: 00000004 PAGE_READWRITE
More info: ~143k
Content source: 1 (target), length: 6858
If we look at above output, usage shows as stack memory, which should never be freed via Heap functions but instead they’re automatically released at the end of usage scope. Lets now look at another address which is located on the Heap…
0:143> !address 0x0000003c`6acbfc00
Usage: Heap
Base Address: 0000003c`6a930000
End Address: 0000003c`6af17000
Region Size: 00000000`005e7000 ( 5.902 MB)
State: 00001000 MEM_COMMIT
Protect: 00000004 PAGE_READWRITE
Type: 00020000 MEM_PRIVATE
Allocation Base: 0000003c`6a220000
Allocation Protect: 00000004 PAGE_READWRITE
More info: heap owning the address: !heap 0x3c74e70000
More info: heap segment
More info: heap entry containing the address: !heap -x 0x3c6acbfc00
Content source: 1 (target), length: 257400
The above memory block is owned by a heap hence this can be freed via HeapFree Windows API and we should not get the HEAP_FAILURE_INVALID_ARGUMENT error. The error ‘HEAP_FAILURE_INVALID_ARGUMENT’ can be further proved by following output from an internal extension command output…
**************************************************************
* *
* HEAP ERROR DETECTED *
* *
**************************************************************
Details:
Heap address: 0000003c74e70000
Error address: 0000003c5cec97a8
Error type: HEAP_FAILURE_INVALID_ARGUMENT
Details: The caller tried to a free a block at an invalid (unaligned) address.
How to configure SharePoint SearchCenter URL?
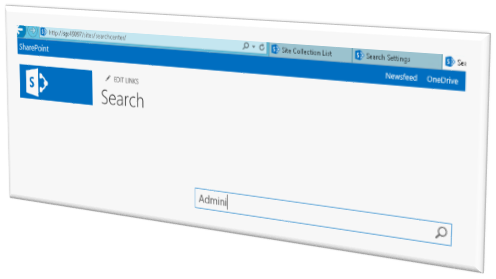
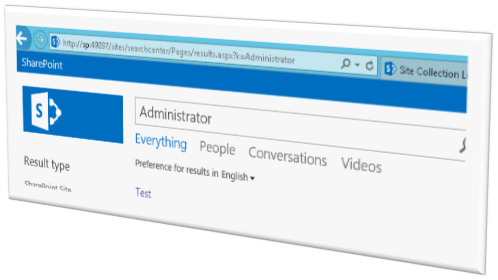
What’s a SearchCenter?
A Search Center site, or Search Center, provides an interface for users to submit search queries and view search results. A Search Center site is the top-level site of a site collection that a farm administrator creates by using the Enterprise Search Center template or Basic Search Center template. Sample search center screenshot…
How to Create a Search Center Site Collection… (from MSDN)
- Verify that the user account that is performing this procedure is a member of the Farm Administrators group.
- On the home page of the Central Administration website, in the Application Management section, click Create site collections.
-
On the Create Site Collection page, do the following:
- In the Web Application section, select a web application to contain the new site collection. To use a web application other than the one that is displayed, click the web application that is displayed, and then click Change Web Application.
- In the Title and Description section, in the Title box, type the name for the new Search Center site. Optionally, type a description in the Description box.
-
In the Web Site Address section, for the part of the URL immediately after the web application address, select /sites/, or select a managed path that was previously defined, and then type the final part of the URL.
Note the address of the new Search Center for future reference.
-
In the Template Selection section, do the following:
-
In the Select the experience version drop-down list, select 2013 to create a Search Center site that provides the SharePoint Server 2013 user experience, or select 2010 to create a Search Center site that provides the SharePoint 2010 Products user experience.
For more information, see Search user interface improvements in What’s new in search in SharePoint Server 2013.
-
In the Select a template subsection, click the Enterprise tab, and then do one of the following:
- If you are using SharePoint Foundation 2013, select the Basic Search Center template.
- Otherwise, if you are using SharePoint Server 2013, select the Enterprise Search Center template.
- If you are using SharePoint Foundation 2013, select the Basic Search Center template.
-
- In the Primary Site Collection Administrator section, in the User name box, type the user name of the primary site collection administrator for this site collection in the form domain\user name.
- (Optional) In the Secondary Site Collection Administrator section, type the user name of a secondary site collection administrator in the form domain\user name.
-
In the Quota Template section, select No Quota.
A Search Center site is not intended to be a data repository. Therefore, you do not have to select a quota template.
- Click OK.
- In the Web Application section, select a web application to contain the new site collection. To use a web application other than the one that is displayed, click the web application that is displayed, and then click Change Web Application.
- On the Top-Level Site Successfully Created page, click the link to the Search Center site that you created.
How to configure the Global SharePoint SearchCenter URL?
Once this site is created we need to tell SharePoint SSA to use this site to submit search queries and view search results. Please note that even UPA uses this SearchCenter for user profile look up so it is important that we set this up the right way to be consumed by UPA as well. From what I know there are couple of ways to do this.
Via PowerShell
$ssa = Get-SPEnterpriseSearchServiceApplication
$ssa.SearchCenterUrl = “SearchCenterURL/pages”
$ssa.Update()
iisreset
Note that you might have to IISReset after this. If you’re doing this via PowerShell I’ve noticed that change will take effect faster than via UI.
Via UI
Open search service application (SSA). Click on value of “Global Search Center URL” to enter new URL….

You should see a popup similar to following dialog popup. Enter new search center URL here.

How to configure the SharePoint SearchCenter URL for a site/site collection?
Please note that above is for global search center URL but you can have site collection or site level search center URL which will override the global search center settings from what I know so far. For setting site collection level SearchCenter URL, access Site Settings->Site Collection Administration->Search Settings, you should see following popup…

For setting site level SearchCenter URL access Site Settings->Search->Search Settings, a dialog similar to the one above should pop up. Once you’ve filled out necessary values you’re good to go.
SearchCenter setting for UPA
So if SearchCenter is not setup, my site settings for your UPA service application will be empty, but if you set it via above powershell or via UI you should following empty field get populated, manually populating this field doesn’t stick.

Once the following PowerShell executes, we see following screenshot now…
$ssa=Get-SPEnterpriseSearchServiceApplication
$ssa.SearchCenterUrl=”searchcenterurl/pages”
$ssa.Update()
iisreset

This time the field is filled out, so when you’re viewing user profile and when clicking on user name and other things pertaining to a user you’ll land on the above SearchCenter page.
‘/Pages’ is important
Remember to append /Pages to the end of the SearchCenter URL. Reason being if you browse to the SearchCenter site and look at SiteContents. You’ll see a pages library which contains all the pages you’ll see as part of the SearchCenter. So if ‘/pages/’ is not appended to the end of the URL you’re bound to get a 404.
Ideally a SearchCenter URL should look as follows: http://sp:port/sites/searchcenter/pages

References…
How to set ServerRender property of a SharePoint WebPart via Powershell?
What’s ServerRender?
ServerRender is a property of a webpart which disables client-side rendering for a webpart. You’ll lose some cool features of a webpart once you enable this feature for e.g.
- Inline editing of a list item, or in other words “Quick Edit”.
- Look and feel of the list changes to the traditional view, from a excel like view.
But this feature is quite handy when it comes to workaround some bugs related to client-side JavaScript.
How do we enable this feature via SharePoint UI?
- GoTo Site settings->Edit page

- Select list web part and then select WEB PART on the ribbon bar, then select the list web parts “Web Part Properties” on this ribbon.

- On the properties window that pops out on the right side, enable “Server Render”, at the bottom of this screenshot…


How do we enable this feature via PowerShell?
I had to dig around a bit to figure this out. Here’s how we do this via PowerShell…
#Web URL, change to your web's URL
$WebUrl = "http://sp/sites/TaskList"
#ListName, change to your list's name
$ListName = "MyTasks"
$web = Get-SPWeb $webUrl

#Get all web parts in this collection, please note this is for default view, if you've got other views please use URL for that view
$WebParts = $web.GetWebPartCollection($web.Lists[$ListName].DefaultViewUrl, [Microsoft.SharePoint.WebPartPages.Storage]::Shared)
#Dump names of all web parts on this page
$WebParts.DisplayName

#Assuming you just have one web part on this page.
$WebParts[0].ServerRender=$true
$WebParts.SaveChanges($WebParts[0].ViewGuid)

$web.Dispose()
The Old Rugged Cross

Microsoft MVP

2009 - 2010
Donations

Thank you for donating
